Colvert

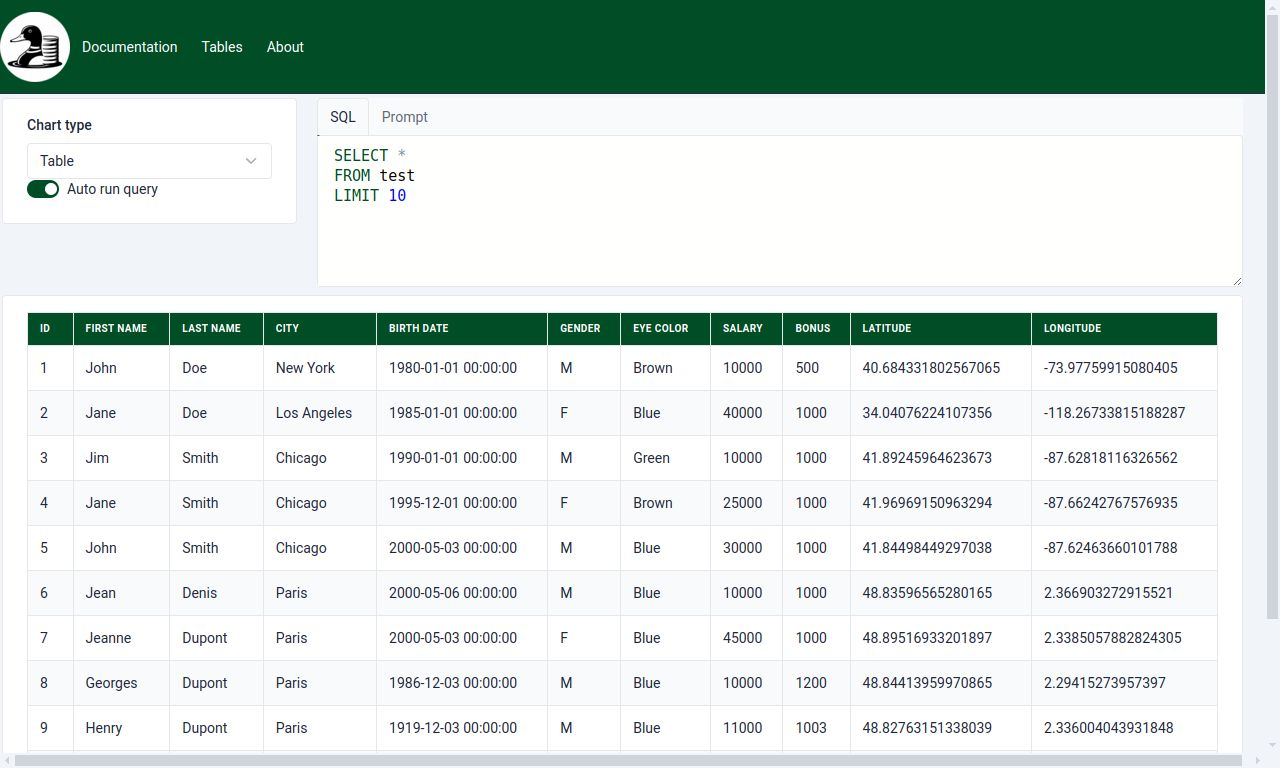
In my free time, I’m working on a toy project named: Colvert. It’s allowed me to test some ideas and play with technology I’m interested (Python, DuckDB, HTMX). But more importantly, it’s software I’m using for my personal needs.

It’s fast UX that allows exploring large CSV/Parquet files using SQL. It’s refreshed as you type and get a graphic with one click. It’s much faster than a spreadsheet and as a developer I feel SQL more comfortable.

Their is a toy LLM integration for text to SQL. It’s domain I want to explore more this year.

You can see a demo here: Colvert

And get the code here (Apache 2.0 license): https://github.com/julien-duponchelle/colvert/

Use Common Crawl to access web data

What is Common Crawl?

Common Crawl is a non-profit organization that crawls the web and freely provides its archives and datasets to the public. The organization was founded in 2007.

The Common Crawl corpus is a petabyte-scale archive of web pages and metadata. The dataset is hosted on Amazon Web Services (AWS) and is freely accessible to the public. The web pages in the dataset are continuously updated and are made available for download on a regular basis.

It’s the perfect tools to build a dataset for your AI project.

The dataset

The dataset is stored in Amazon S3. You can access the dataset using S3 API or by plain HTTP. S3 access is more optimized and recommended.

The dataset is split into multiple files. Each file is a part of the dataset and contains a subset of the web pages.

How to access the dataset

First go to https://commoncrawl.org/get-started

And select the last dataset available: dataset

types

You can download the whole dataset but it’s unlikely that you have the storage to store it. But you don’t need to download the whole dataset if you are interested in a specific part of the dataset. You can download only the pages that you need.

To extract a page from the dataset you need:

  • The segment file of the page
  • The offset of the page in the segment file
  • The length of the page in the segment file

This information is stored in the index of the dataset. The index is a file that contains the location of each URL in the dataset.

Once you have this information, you can perform an HTTP range request to download the page.

import gzip
import io

import requests

segment_file = 'crawl-data/CC-MAIN-2023-50/segments/1700679100499.43/warc/CC-MAIN-20231203094028-20231203124028-00893.warc.gz'
offset = 225013702
length = 7069

url = f'https://data.commoncrawl.org/{segment_file}'
response = requests.get(URL, headers={'Range': f'bytes={offset}-{offset+length-1}'})
if response.status_code == 206:
    content = response.content
    # Decompress the data
    with gzip.open(io.BytesIO(content), 'rb') as f:
        content = f.read()
    print(content)
else:
    print(f"Failed to fetch data: {response.status_code}")

How to get the location of a page in the dataset

Use the Common Crawl Index API

The Common Crawl Index API is a service that provides a simple interface to search the Common Crawl corpus. The API allows you to search for web pages that match a specific query.

The API is very simple you just pass the URL of the page that you are looking for and the API will return the location of the page in the dataset.

For example, for the page https://commoncrawl.org/faq you can use the following request:

http://index.commoncrawl.org/CC-MAIN-2023-50-index?url=commoncrawl.org%2Ffaq&output=json

You can replace CC-MAIN-2023-50 by the last dataset available.

{"urlkey": "org,commoncrawl)/faq", "timestamp": "20231203094453", "url": "https://commoncrawl.org/faq", "mime": "text/html", "mime-detected": "text/html", "status": "200", "digest": "E6N62SALJEROKFK4BVRK523WLDBV67RW", "length": "7069", "offset": "225013702", "filename": "crawl-data/CC-MAIN-2023-50/segments/1700679100499.43/warc/CC-MAIN-20231203094028-20231203124028-00893.warc.gz", "languages": "eng", "encoding": "UTF-8"}

The Common Crawl foundation provides a full example on how to use the API and retrieve the page: https://gist.github.com/thunderpoot/58a748565d2e5b2582520fa535821908#file-cc_fetch_page-py

This method is the easiest way to get the location of a specific page in the dataset but if you need to get the location of a lot of pages it’s not the best way to do it.

Use the index files

You can download all the index files from the dataset and search the location of the page in the files.

The file cc-index.paths.gz contains the location of all the index files. You can download this file and extract the location of the index files. The whole index size is around 300GB compressed.

Other versions of the index file cc-index-table.paths.gz is available. This is the same data but as Apache Parquet files. This format can be read by tools like DuckDB, Apache Spark, Trino… The usage will be similar to the usage of the AWS Athena.

Use AWS Athena

Athena is a Trino-based serverless interactive query service that makes it easy to analyze large amounts of data in Amazon S3 using standard SQL.

Athena is cost-effective and easy to use. There is no need to set up or manage infrastructure, and you only pay for the queries that you run.

You pay 5$ by TB scanned. If you correctly use the partitioning of the dataset the cost can be very low.

Setup Athena

You need to select the region US-East-1 (N. Virginia) to access the common crawl dataset.

Open the query editor and create a new database:

CREATE DATABASE ccindex

Next you need to create a table by running the following query: https://github.com/commoncrawl/cc-index-table/blob/main/src/sql/athena/cc-index-create-table-flat.sql

CREATE EXTERNAL TABLE IF NOT EXISTS ccindex (
  url_surtkey                   STRING,
  URL                           STRING,
  url_host_name                 STRING,
  url_host_tld                  STRING,
  url_host_2nd_last_part        STRING,
  url_host_3rd_last_part        STRING,
  url_host_4th_last_part        STRING,
  url_host_5th_last_part        STRING,
  url_host_registry_suffix      STRING,
  url_host_registered_domain    STRING,
  url_host_private_suffix       STRING,
  url_host_private_domain       STRING,
  url_host_name_reversed        STRING,
  url_protocol                  STRING,
  url_port                      INT,
  url_path                      STRING,
  url_query                     STRING,
  fetch_time                    TIMESTAMP,
  fetch_status                  SMALLINT,
  fetch_redirect                STRING,
  content_digest                STRING,
  content_mime_type             STRING,
  content_mime_detected         STRING,
  content_charset               STRING,
  content_languages             STRING,
  content_truncated             STRING,
  warc_filename                 STRING,
  warc_record_offset            INT,
  warc_record_length            INT,
  warc_segment                  STRING)
PARTITIONED BY (
  crawl                         STRING,
  subset                        STRING)
STORED AS parquet
LOCATION 's3://commoncrawl/cc-index/table/cc-main/warc/';

The table is not created but if you try a query it’s not going to work.

You need first to repair the table:

MSCK REPAIR TABLE ccindex

You will also need to do that when a new dataset is available.

Run a query

First you can try that the dataset is correctly loaded by running the following query:

SELECT * FROM ccindex LIMIT 1

alt text

When you do a query make sure to pay attention to the cost of the query.

alt text

To reduce the cost makes sure to use the crawl and subset columns in your query. This will reduce the amount of data scanned because the dataset is partitioned by crawl and subset.

Also use LIMIT to reduce the amount of data returned by the query.

This request will return to the location of all the pages of the website trino.io:

SELECT URL,
       warc_filename,
       warc_record_offset,
       warc_record_length
FROM ccindex
WHERE crawl = 'CC-MAIN-2023-50'
AND subset = 'warc'
AND url_host_name = 'trino.io'
AND content_mime_type = 'text/html'
LIMIT 1000

alt text

You can after export it as a CSV file and use it to download the pages.

Conclusion

Common Crawl is amazing tool to access web data without the need to crawl the web yourself. The dataset is huge and it’s perfect for bootstrapping AI projects.

Use a proxy with Waydroid

Waydroid is a project that allows you to run Android applications on a Linux distribution. It’s a fork of the project Anbox-Android-in-a-Box. Android applications are run in a container and do not have the overhead of emulators.

This article will explain how to use a proxy with Waydroid and intercept the traffic using a proxy. This can be useful to reverse engineer an API or for security testing.

Install Waydroid on Ubuntu

First, you need to install Waydroid on your Ubuntu distribution. You can follow the instructions on the official website.

Here is a quick summary:

$ sudo apt install curl ca-certificates -y # Install curl and ca-certificates
$ curl https://repo.waydro.id | sudo bash # Add the repository 
$ sudo apt install waydroid adb -y # Install Waydroid package and Android Debug Bridge
$ sudo systemctl enable --now waydroid-container # Start the service

BE CAREFUL: Waydroid require Wayland.

At this point, you should be able to launch Waydroid from the application menu. You will be prompted to download the Android image with or without the Google applications. Once the download is complete, you will be able to launch Android applications.

If the newtork doesn’t work you can use https://github.com/waydroid/waydroid/issues/143

sudo sed -i~ -E 's/=.\$\(command -v (nft|ip6?tables-legacy).*/=/g' \
     /usr/lib/waydroid/data/scripts/waydroid-net.sh

Install a Proxy

We are going to use Mitmproxy as a proxy. You can install it with the following command:

$ sudo apt install mitmproxy -y

Mitmproxy will be used to intercept the traffic between the Android application and the Internet. It’s an Open Source project that allows you to inspect and modify HTTP traffic. It’s also easy to script with Python.

Mitmproxy can be used as a command-line tool or with a web interface. We are going to use the web interface.

You can start Mitmproxy with the following command:

$ mitmweb -p 8888

This will start Mitmproxy on port 8888 and launch the web interface. You can access the web interface by opening the following URL in your browser: http://127.0.0.1:8081

Test with curl

You can test the proxy with Curl. You need to set the proxy with the following command:

$ export http_proxy=http://127.0.0.1:8888

Next, you can test the proxy with the following command:

$ curl http://example.com

You should see the request in the Mitmproxy web interface.

If you try to proxy HTTPS traffic, you will get a certificate error.

$ export https_proxy="http://127.0.0.1:8888"
$ curl https://example.com

You can ignore the certificate error with the following command:

$ curl --insecure https://example.com

To make it work in Waydroid you will need to install the certificate in the Android image.

The certificate is located in the following directory: ~/.mitmproxy/

Setup the proxy in Waydroid

First you need to get the IP address of your computer on the container network. You can get it with the following command:

$ ip address show waydroid0
18: waydroid0: <BROADCAST,MULTICAST,UP,LOWER_UP> mtu 1500 qdisc noqueue state UP group default qlen 1000
    link/ether 00:16:3e:00:00:01 brd ff:ff:ff:ff:ff:ff
    inet 192.168.240.1/24 brd 192.168.240.255 scope global waydroid0
       valid_lft forever preferred_lft forever
    inet6 fe80::216:3eff:fe00:1/64 scope link
       valid_lft forever preferred_lft forever

Here the IP is 192.168.240.1

We restart Mitmproxy with the following command:

$ mitmweb -p 8888 --listen-host 192.168.240.1

Then you can configure the proxy in Waydroid with the following command:

$ adb shell settings put global http_proxy "172.17.0.1:8888"

You can now test in the browser a non HTTPS page.

Install the certificate in Waydroid

All credit goes to this GitHub issue.

First you need the certificate hash.

This is the first line of the output of the following command:

$ openssl x509 -subject_hash_old -in ~/.mitmproxy/mitmproxy-ca-cert.pem
a8990c1d

Next we create an overlay directory in Waydroid:

$ sudo mkdir -p /var/lib/waydroid/overlay/system/etc/security/cacerts/

-p is used to create the parent directories if they don’t exist.

And we copy the certificate in the overlay directory:

$ sudo cp ~/.mitmproxy/mitmproxy-ca-cert.pem /var/lib/waydroid/overlay/system/etc/security/cacerts/a8990c1d.0
$ sudo chmod 644 /var/lib/waydroid/overlay/system/etc/security/cacerts/a8990c1d.0

Pay attention to the extension of the certificate. It must be .0 and the file name must be the hash of the certificate.

Remove the proxy

adb shell settings put global http_proxy :0

Oreille

A small week end project: Oreille is a wrapper on OpenAPI Whisper API. It provides support for long audio files.

OpenAPI Whisper support only files that are less than 25 MB. Oreille will break the audio file into chunks of 25 MB’s or less. https://platform.openai.com/docs/guides/speech-to-text/longer-inputs

Oreille will also compute the correct timing of the subtitle when merging the output of Whisper. So once you export the subtitle the timestamp of the subtitle will be right.

You can open and save WAV files with pure python. For opening and saving non-wav files – like mp3 – you’ll need ffmpeg or libav.

View project on Github

How an HTTP/HTTPS proxy work

The goal of this article is to explain how a minimal HTTP/HTTPS proxy work.

HTTP

For an HTTP proxy the communication is simple the client etablish a TCP connection to the proxy and send the HTTP request. The proxy will parse the HTTP request and forward it to the server. The server will reply with the HTTP response and the proxy will forward it to the client.

The main difference is the method will be followed by the full URL of the target server.

GET http://www.example.org/index HTTP/1.1
Host: example.org:443

HTTPS

When the client open the connection to the proxy he will send the CONNECT HTTP method followed by the host and port of the target server.

It’s a classic HTTP request with headers. The proxy will stop to parse once it has read the double CRLF.

CONNECT example.org:443 HTTP/1.1
Host: example.org:443

The proxy will reply with the status 200:

HTTP/1.1 200 OK

Now we have a bidirectional tunnel between the client and the server. The proxy in the middle will just forward the data and is not going to be able to read it.

The client will now send the TLS handshake to the server and the server will reply with the TLS handshake. Once it’s done the communication is etablished and the client can send the HTTP request to the server.

JSONApiDoc

JSON Api Doc une petite bibliothèque Open Source que j’ai publiée.

En manipulant des API en JSON API une chose m’a beaucoup gêné. L’utilisation des included pour éviter de dupliquer les données rend la lecture très difficile par un humain.

Cette bibliothèque utilisable dans un programme Python ou en cli permet tout simplement de résoudre les included et de renvoyer un objet plus simple à lire et à manipuler par un humain.

Par exemple:

{
  "data": [{
    "type": "articles",
    "id": "1",
    "attributes": {
      "title": "JSON API paints my bikeshed!",
      "body": "The shortest article. Ever.",
      "created": "2015-05-22T14:56:29.000Z",
      "updated": "2015-05-22T14:56:28.000Z"
    },
    "relationships": {
      "author": {
        "data": {"id": "42", "type": "people"}
      }
    }
  }],
  "included": [
    {
      "type": "people",
      "id": "42",
      "attributes": {
        "name": "John",
        "age": 80,
        "gender": "male"
      }
    }
  ]
}

Donnera:

[
    {
        "type": "articles",
        "id": "1",
        "title": "JSON API paints my bikeshed!",
        "body": "The shortest article. Ever.",
        "created": "2015-05-22T14:56:29.000Z",
        "updated": "2015-05-22T14:56:28.000Z",
        "author": {
            "type": "people",
            "id": "42",
            "name": "John",
            "age": 80,
            "gender": "male"
        }
    }
]

Le code est disponible sur GitHub